Step 1 - configure territory building blocks
Click here to download the complete files for all steps in this tutorial.
In this tutorial we will design sales territories based on UK postcode areas. Firstly, unzip the tutorial files to a directory on your computer. Start ODL Studio and open the file input data.xlsx from this directory. This contains customer records in the same format as the previous tutorials.
Importing polygon building blocks
Firstly import the UK postcode areas shapefile from the reconstructed UK postcode polygons available from the downloads page. Download the reconstructed polygons zip file, unzip it and extract it to a directory on your computer. From the File menu, choose the option Import, Shapefile (link geometry to original file) and then select the file areas.shp from the unzipped directory. Shapefiles can be imported into ODL Studio in two different ways – either by keeping a link to the original file or actually importing the physical geometry in well-known-text format into the Excel spreadsheet. You should link rather than physically import as Excel places a limit on the amount of data which can be held in a cell, which may stop your spreadsheet loading in Excel for large geometries.
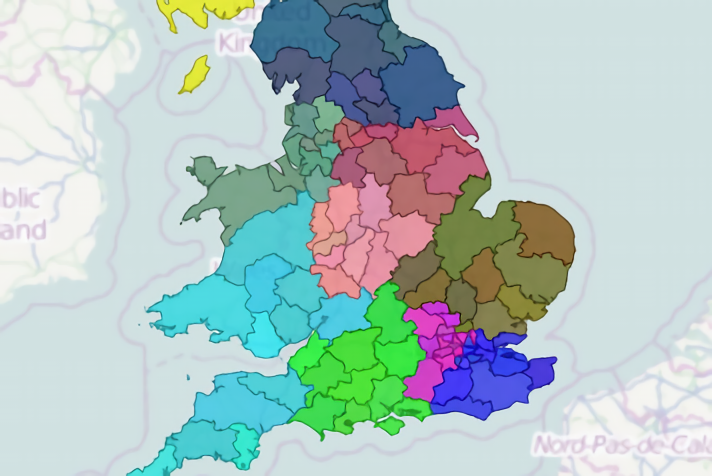
You should now have an Area table in your spreadsheet. You can view a map of the postcode areas using the show map wizard detailed in previous tutorials:
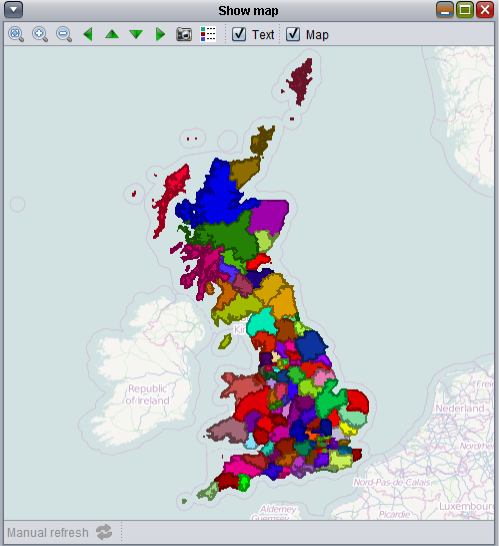
To colour this map we set the colourkey column in the show map adapter to use the area’s name field, so the map colours each area differently based on its name.
Shapefile links
If you open the Area table and inspect the column named the_geom, you should see each value in the column contains text similar to the following:
shapefilelink("c:\my unzipped directory\Areas.shp","Areas","Areas.1")
where my unzipped directory is the directory you unzipped the original shapefile to. The only difference between the values on different rows is the last string, which would normally be Areas.1 on the first row, Areas.2 on the second row, etc... A shapefilelink contains these three strings:
- The filename on your computer of the shapefile.
- The name of the type within the shapefile you want to load (in this case Areas).
- The identifier of the individual geometry object you want to load (e.g. Areas.1).
The previous example shapefilelink is absolute - it refers to the shapefile at c:\my unzipped directory\UK postcode areas\Areas.shp on your computer. This link will not work in another ODL Studio running on another computer unless you have the shapefile in exactly the same location on both computers. This makes your spreadsheet harder to share with colleagues. There are two solutions available to this - either (a) physically import the geometry instead in well-known-text format so the geometry data sits in the spreadsheet (and you may loose the ability to open the spreadsheet in Excel, but not in Libreoffice / OpenOffice) or (b) use a relative shapefile link instead. This is a relative shapefile link:
shapefilelink("Areas.shp","Areas","Areas.1")
Your ODL Studio's installation directory should contain a subdirectory named data which itself contains a subdirectory named shapefiles. Relative shapefile links are always relative to this shapefiles directory. If your installation directory is C:\Program Files\ODL Studio, then when ODL Studio processes the previous shapefile link it will load the following shapefile:
C:\Program Files\ODL Studio\Data\Shapefiles\Areas.shp
If you keep your shapefiles within ODL Studio's shapefiles directory (or any subdirectories of this), then when you import the shapefile into the spreadsheet the shapefile link will automatically be created as relative instead of absolute. You can then share the spreadsheet with colleagues and all shapefile links will work perfectly, providing they have a copy of the same shapefile in the same location within their own copy of ODL Studio's shapefile directory. In summary,
- For a relative shapefile link, you only need the same directory structure within ODL Studio's shapefile directory.
- For an absolute shapefile link the shapefile must be in exactly the same location on both computers (which would make it impossible to use the same spreadsheet on Windows and Linux).
Tip - the completed Excel spreadsheet files for this tutorial use relative shapefile links. If you want to use these files you need to unzip the postcode polygons zip into your ODL Studio's shapefiles directory.
Alternatives to importing geometry
When doing sales or delivery territory analysis with your own data, you may already have records for your building blocks (e.g. postcode areas, districts, etc… ) imported into your spreadsheet and you only need the geometry of the building block (i.e. the polygon shape) for displaying in the map. In this scenario you can entirely skip importing of the building block geometry. Instead within the show map’s data adapter, use the function shapefilelookup to retrieve the geometry of an object in the shapefile based on one of its attributes. See the function definition (under help in ODL Studio) for more details on shapefilelookup.
Create PostcodeArea column
To use the area building blocks we need to know how many customers, sales, workload etc. are in each area. This information is currently held in the Customers table. We therefore create a key field in the Customers table which links to the Area building block and then use this in an update query.
Select the Customers table in the tables list, right-click and select the Edit table schema option from the pop-up menu. This brings up the table schema for Customers. Use the add button at the bottom of the schema dialog to add a new column and then double click on the new column and rename it to PostcodeArea. Ensure its type is set to string.
Select the Customers table in the table list, right-click on it and choose the Component Wizard, Update table menu item. As we only want to modify the PostcodeArea field, in the table adapter grid delete all columns except PostcodeArea, using the delete button in the toolbar directly below the grid (the red cross). Then tick the box to show that PostcodeArea is calculated and enter the formula postcodeukarea(postcodeukunit(address)). Your dialog should now look like the following:
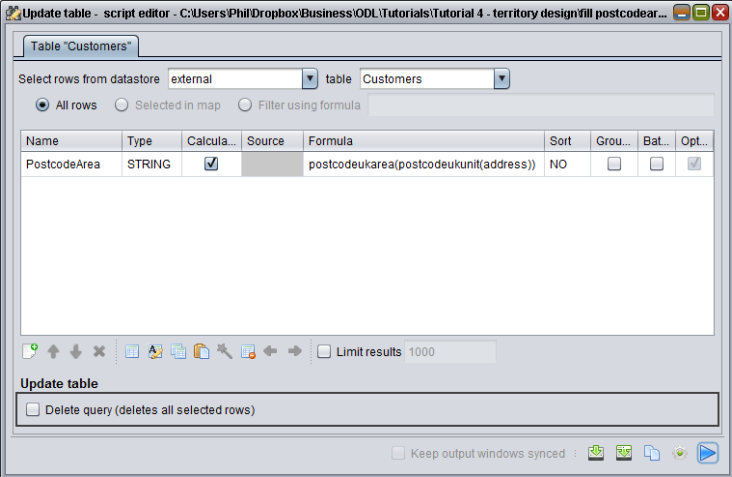
Addresses in our customer table also contain the postcode – for example 8 Wilmot Road, Carshalton Central, London, SM5 3PN and 28 Darwin Walk, Duston, Northampton, Northamptonshire, NN5 6LS. We therefore need to find the UK full postcode within the address string and then get the postcode area component of this – which is what the formula does. Now run the update table script by pressing the blue play button. If you open the Customers table you should now see the PostcodeArea column has been filled in.
We now check for any Customer records where the UK postcode area is invalid or unknown. Select the Customers table, right click on it and select the Component Wizard, Query Table menu item (renamed show table in ODL Studio versions after 1.0.0). In the adapter wizard select filter using formula and enter the formula lookupcount(postcodearea, "areas", "name")=0. This formula filters the Customer table for those records whose PostcodeArea column has no matching entry in the Areas table. Your adapter should appear as follows:
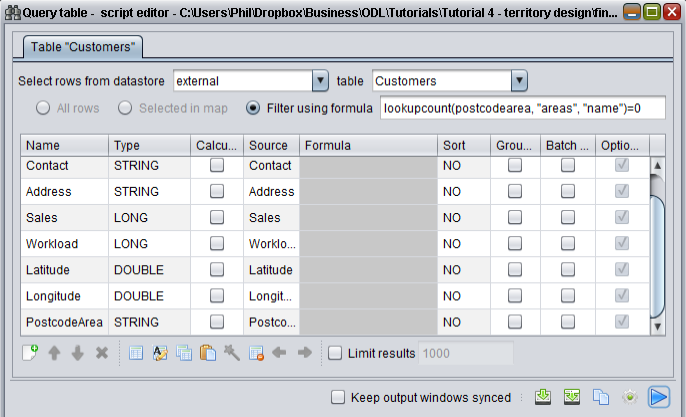
Now run the script by pressing the blue play button. The table which appears should be empty as all of the Customer records should be linked to a UK postcode area.
Update counts on building blocks
Now we have linked customers to the postcode area building blocks, we need to sum the quantities (customers, workload etc.) for each area and write this information back onto the Areas table.
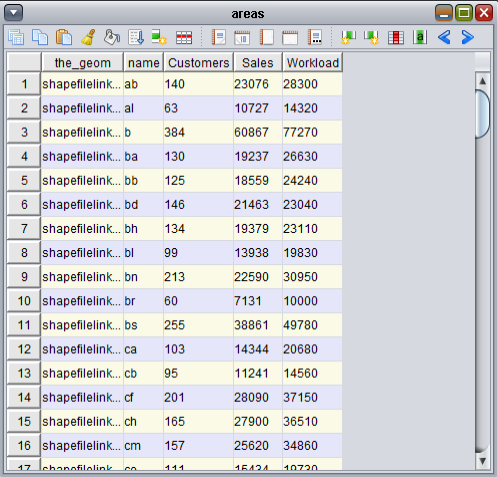
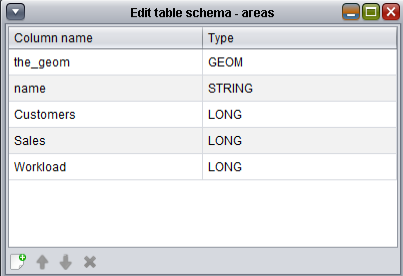
Right-click on the Areas table in the tables list and select Edit table schema (or alternatively click the button in the toolbar below the tables panel). Add columns Customers, Sales and Workload to the Areas table, setting each one to have type long (this is an integer type, i.e. a whole number). Your schema should now look like the following:
Select the Area table in the tables list, right click and from the Component wizard, select Update table. Set-up the adapter as follows:

We have removed the name and the_geom columns as these are not being modified. The remaining columns will be updated with the sum of customers, sales and workload within the postcode area, using the linked PostcodeArea column we populated in the previous step.
Now press play and then open the Areas table. You should see the Customers, Sales and Workload columns populated with the sums: